FM Night Builder Info

Table of content
1) Overview
2) Customization basics
3) Scales
4) Lighting
5) Camera
1) Overview
FM Night Builder offers 10 night presets, adding a 360° night background to your scenes with a single click. However, there are tons of options to customize it to your liking.
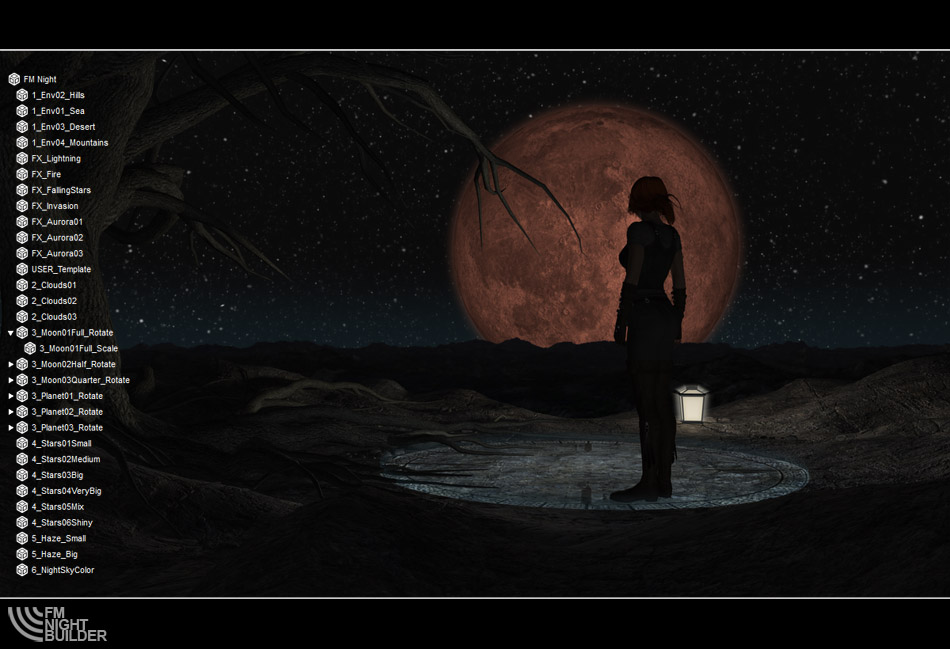
Each preset loads 23 centered spheres, think of them as layers.
The inner layers would hold the environments, the next layers hold the clouds, and so on. There are also seperate 2D planets/moons which can be placed where you need them.
2) Customization basics
To start with, each preset loads the same amount of spheres, you can work with any of them. The “Neutral Preset” would still be the best general use starting point, with no color or scale changes applied to it.
– Hide/Show
That`s the most basic thing. Which parts of the prop do you want to see?
Clouds A or Clouds B, or both? A moon? Lightning? Big stars or small ones?
– Ambient color
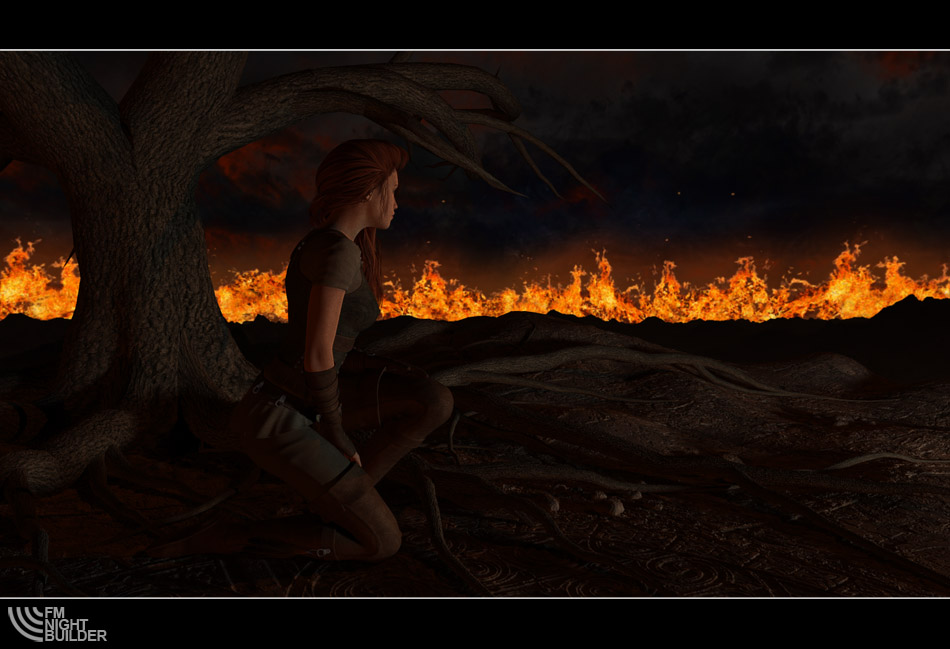
Most layers are solely driven by a transparency texture, there is no fixed color. Thus ambient color applies very well. Blue stars, green clouds, the color of the Aurora Borealis, it`s all up to you. The four environment (horizon) layers are the exception, they have a dark diffuse map. You can still give it a color tint, like the red tone I added on the burning horizon preload.
The most common use for ambient color would be the clouds, go towards black for dark clouds, or towards white for brighter ones.
-Rotation
You can either rotate the whole prop, or each sphere on its own. In most cases you`ll want to rotate the Y-axis.
If you like that big mountain on the horizon, but want the clouds to look a bit different, just rotate the clouds.
-Scale
Scale is very important since it defines the sorting of your layers. The global scale of a sphere defines where a layer renders relative to the others, e.g. in front or behind the clouds.
Scaling (down) along the Y-axis can give interesting results too, e.g. you can use it to make the Auroras smaller, or bring higher parts of the clouds down.
Be careful not to produce clipping though.
-User Template
One of the spheres / textures is named “User_Template”. It should be useful if you want to add a texture of your own to the sky, like a logo, letters or effects.
-Opacity
Reducing the Opacity can be useful if you want to soften a layer, e.g. have the fire layer less agressive.
On Daz Studio you simply reduce the strength. On Poser you have to use darker colors on Value 2 of the math node (transparency channel).
Note: unfortunately neither Daz Studio nor Poser can give you a clean preview, due to transparency sorting issues. Usually it`s enough to get an impression of what you are doing though, and it renders fast, so you can do preview renders quickly.
Tip: If you want a clean look at a layer in the workspace just temporarily hide the other layers to avoid those sorting issues.
3) Scales (Neutral Preset)
– Environment layers 91-93 %
– FX (effect) layers 95-102 %
– Gap 103-104
– Cloud layers 105-107 %
– Gap 108+
– Moons and Planets
– Star layers 125-130 %
– Haze Layers 135-136%
– NightSkyColor 140%
As you can see there are small gaps between the sections. Those gaps are good to use if you want to change the sorting.
E.g. The biggest cloud scale is 107%, if you want to sort one of the FX layers behind the clouds set it to 108%.
The moons and planets all have a hidden center object named _Rotate. Rotating this will move them nicely across your sky. To scale a moon/planet select the child, named _Scale.
With very big scales (250% +) you have to be careful not to clip through the clouds.
4) Lighting
Well, you don`t light the night background, as it is driven by ambience, but you`ll want to light the scene you use it with. As a general tip I`d recommend using some sort of very soft ambient lighting (e.g. distant lights) to fit the general brightness of your set to the night background.
Then add localized lights like spots or range-limited point lights to light the point of interest, e.g. the place where you have a character standing.
A lighting preset that works well with the included rock&tree prop is included.
5) Camera
I always say the same thing, but still… 😉 …if you aim for an impressive horizon in your render use a wide camera angle.