G-Suit2HD Info
![]()
Content:
Preset Types
What is a HD Morph?
Morphs (Color Code and description)
Mesh Smoothing
Tips and Workflow to create your own styles
Supported Figures
Saving your own creations
Sharing your creations
Templates / UVs
Poser compatibility
Bonus Presets
—
Preset Types
Materials Generic
This folder holds seamless materials you can apply to G-Suit2HD.
Hold the Ctrl-key to apply them only to the surfaces you have selected in the Surface tab.
That way you can e.g. have the torso covered in leather, the arms in latex, the legs in cloth.
Combined with the HD morphs this is quite powerful for creating your own styles.
The cloth, latex and spandex materials are color-neutral. You can set any color you want on the diffuse channel (Surface Tab).
The two spandex materials load with different settings, silver has more structure, gold is more shiny.
For best results with Latex and Spandex I recommend to have only the main light in the scene casting speculars, setting secondary lights to “Diffuse Only”.
Presets Generic
Those are presets made from generic materials and HD-morphs, as described above.
You can think of it as examples for what you can do yourself if you want to.
Opacity Map Presets
Adds opacity maps, and, in most cases, related morphs.
E.g. a neck-cut and the according finishing morph.
Presets Full
Complete presets with custom made textures. Right now this holds the “Huntress” outfit (and two variations).
I hope to fill this up with addons over time.
Partial Presets
Right now you can load the gloves and boots section from the “Huntress” outfit here. Makes sense if you want the body in your own style but add gloves or boots with properly textured straps.
—
What is a HD Morph?
High Definition Morphs are relatively new to Daz Studio.
The basic idea is to add detail to your renders without taxing your system in the viewport (the 3D preview you work with).
This is based on “subdivisions”.
If you take a look at Parameters Tab / Mesh Resolution you will see a dial for SubDivision Level, which is usually set to 1.
This defines the maximum resolution you see in the viewport.
HD morphs use a higher resolution than that, which means that the viewport only gives you a very rough preview, but in return your system doesn`t slow down.
You are free to set a higher value for SubDivision Level in order to get a more accurate preview, but keep in mind it can have a massive impact on your system`s speed.
The important thing to remember is that the HD morphs will always render at their own high resolution no matter what you see in the viewport.
Render-times naturally increase a bit with active HD morphs, after all it`s extra detail, but I think it`s not a big deal.
—
Morphs (Color Code and description)
I suppose the amount of HD morphs can be overwhelming, and it doesn`t help that it`s hard to see what they do in the viewport (on default subdivisions).
To help finding what you are looking for the morphs are color coded, mostly in line with the G-Suit`s color code.
Head: Light Blue
Neck: Orange
Torso: Red
Arms: Brown
Legs: Blue
If you want the viewport preview to better show what the HD morphs are doing you can go to Parameters/Mesh Resolution and up the SubDivisions Level to 2 or 3. This can have a strong impact on your system`s performance though.
—
What do all those morphs do?
Adjustments:
“Expand_Body” is probably the morph you will use the most. It expands only the main body but leaves hands, feet and head alone.
Very useful if you get some poke-through from Genesis2.
There is no reason to be shy about using it, G-Suit2HD is modeled extremely close (1mm) to Genesis2, so even if you expand it it`s still tighter than most clothing items.
Belts and Straps:
Kinda self-explanatory. Belts and Straps. Likely to be used mostly in team with custom made textures.
Breastspans:
Breastspans for all supported Genesis 2 Females. Requires to meet the percentages you have dialed in on Genesis.
E.g. if you have a Character 50% Victoria and 25% Stephanie thats what you need for breastspans too, plus 25% Female Base if you`d like.
Poses can still break the breastspans, so honestly, its hit or miss.
Finishings:
Use this to shape the outlines (rims) of your clothing creations. They are usually numbered outwards, e.g. Leg01 is closest to the hips, leg09 closest to the feet.
I find it easier to start dialing in finishes and set the material opacities afterwards.
Folds:
There are two kinds of folds, thin and fat. I like to mix them, and usually keep them at low values, especially the thin folds.
Relax:
Similar to Breastspans, but for other zones. Like Breastspans it`s a bit hit or miss, depending on the character.
All included Presets load without any relax morphs dialed in. Relax Toes is pretty useful to get a better look for boots or socks.
Seams:
S1 (style1) are thin “inside” seams. S2 are more pronounced “outside” seams. If you want you can also mix them.
This section also holds some Zippers. The thin one is ok for generic textures, the others certainly make more sense with custom textures.
Special:
Everything that doesn`t fit above, likely a section I`ll grow with addons. The mask morph is fun. 😉
—
Mesh Smoothing
Mesh Smoothing (found under Parameters/Mesh Smoothing) is off by default. This allows the G-Suit to pick up almost every detail of your characters.
It also allows for poke-through, which is why many clothing items have it on by default.
Turn it on if you either want less detail on the suit (e.g. get rid of muscle definitions) or have poke-through issues.
For the later personally I`d rather refer to the Expand_Body morph or -worst case- hide the body part on Genesis.
Mesh Smoothing should not be used on presets which have the Eyes section visible, since it picks up on Genesis` eye-lashes and thereby causes distortion in that region.
—
Tips and Workflow to create your own styles
In most cases I prefer to start with dialing in the finishings, and set the opacity for the material zones later. This way you avoid the confusion of using finishing dials on already hidden zones.
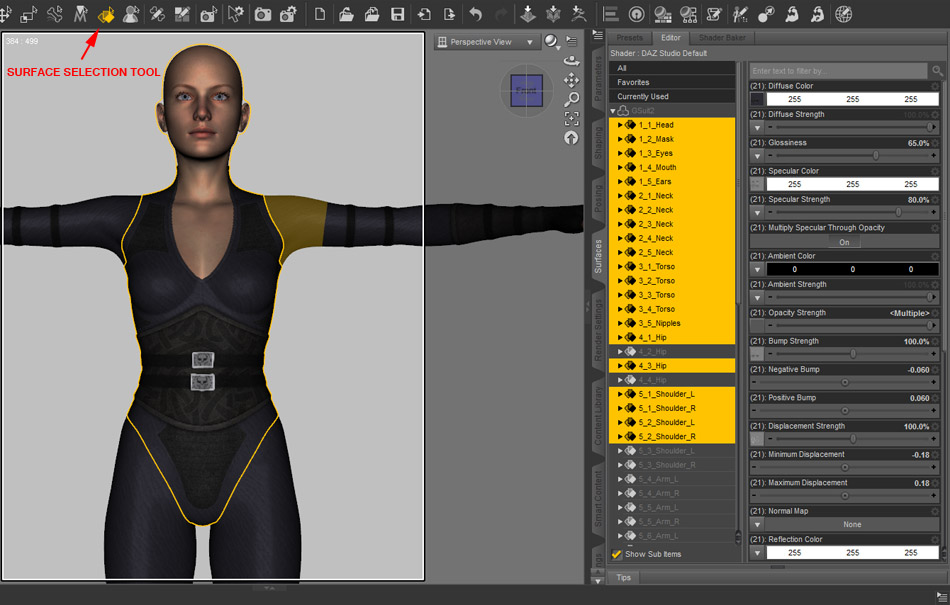
When selecting surfaces to either apply generic materials or set the opacities I always have Daz Studio`s Surface Selection Tool active.
This gives you a nice visual representation of the selection, even if you do the actual selection on the Surface Tab.
If you use the Selection Tool directly hold Ctrl for multi-selection, on the Surface Tab you can use both Ctrl and Shift.
If you like creating your own custom textures make sure to download the Templates.
Aside from UVs and Color Code you will also find a PSD which holds many of the HD Morphs exported as Displacement Maps, – very useful as selection masks for stitches, seams, highlights, etc..
—
Supported Figures
You can use G-Suit2HD with all Genesis 2 Females, but will usually get the best results on supported figures (custom FBMs / FHMs).
Those are: Female Base, Victoria 6, Stephanie 6, Giselle, Lilith 6, TeenJosie, Olympia, Gia, Girl 6, Aiko 6.
There`s also custom FBMs for “Fitness” and “Bodybuilder”.
—
Saving your own creations
If you created a nice style with morphs and generic materials you might want to save it for later use outside of your current scene.
To do that, best use:
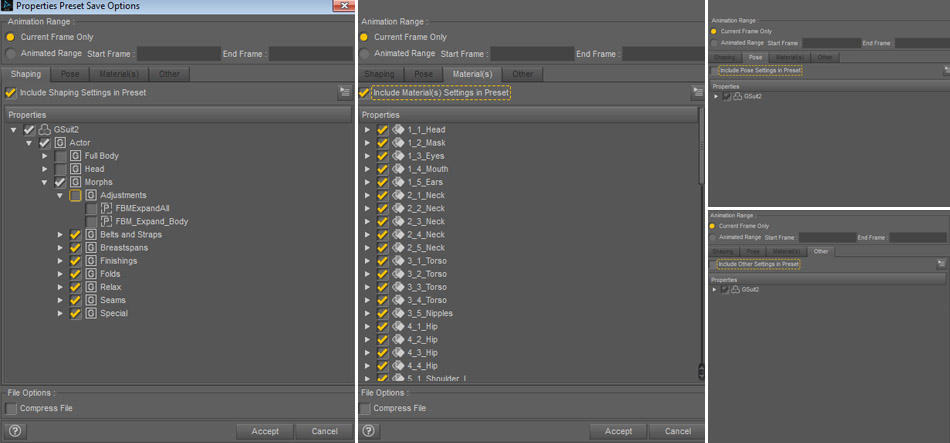
File / Save As / Properties Preset
You get four Tabs there. Uncheck the “Pose” and “Other” sections.
Check “Shaping” and “Material(s)”.
On “Shaping” only check “Actors/Morphs”, unckeck “Full Body” and “Head”.
In Actors/Morphs I also uncheck the “Adjustments” section since it doesn`t really belong to the styling.
—
Share your creations
If you saved out your own style as descibed above it`s pretty easy to share it with others, and you are very welcome to do so.
The only file needed is the the preset .duf you saved (and the thumbnail if you want it to show up properly).
In order to keep shared files close to the other presets they should go to …/People/Genesis 2 Female/Clothing/FMGsuit2. For my own use I added a folder “User Presets” there, to seperate them from included presets.
It`s ok to share presets you have started from one of the included presets, no matter how much you changed it. If you just gave a shirt a different color and think others might like it go for it.
But please do never share the included original textures, it`s not needed and just a risc to mess things up.
Custom Textures
However, you are welcome to add and share your own custom textures of course. For non-commercial purposes you may use any of the generic materials/textures as a starting point, but always rename them to avoid overwrites. All the included generic textures are named starting with GS2_Gen, so it`s easy to identify them. You should place such textures in …Runtime/Textures/YourTextureFolderName.
Note: Many of the generic materials don`t have a texture in the diffuse channel. If you wanted to let`s say add a logo to such a material you`d have to start a new basic texture.
Please respect other peoples copyrights, don`t use any shaders or products which are not free for sharing.
—
Templates / UVs
If you want to create new textures the templates should be useful.
Download G-Suit2HD Templates
—
Poser compatibility
G-Suit2HD does not have built-in Poser support (no companion file), but it seems to work quite well nonetheless, at least if you know how to create your own companion files. Personally I don`t use Genesis in Poser, but Fisty was so kind to take a very thorough look.
It seems everything worked fine (morphs, Genesis shapes, posing), but of course the materials require some work. Going by my general Poser experience the materials might miss the displacement/bumpmap channels and have weird specularity values.
In order to keep rendertimes reasonable you should turn off “visible in raytracing” (I think that`s the equivalent to Daz Studio`s “cast shadows”) or set a relatively high shadow bias.
Like I said, I don`t know anything about using Genesis with Poser. Going by Fisty`s report I think it`d be fair to say G-Suit2HD works as well in Poser as you can hope for on a product without built-in support.
—
Bonus Presets (free)
Get two additional generic presets here:
Bonus Presets
—